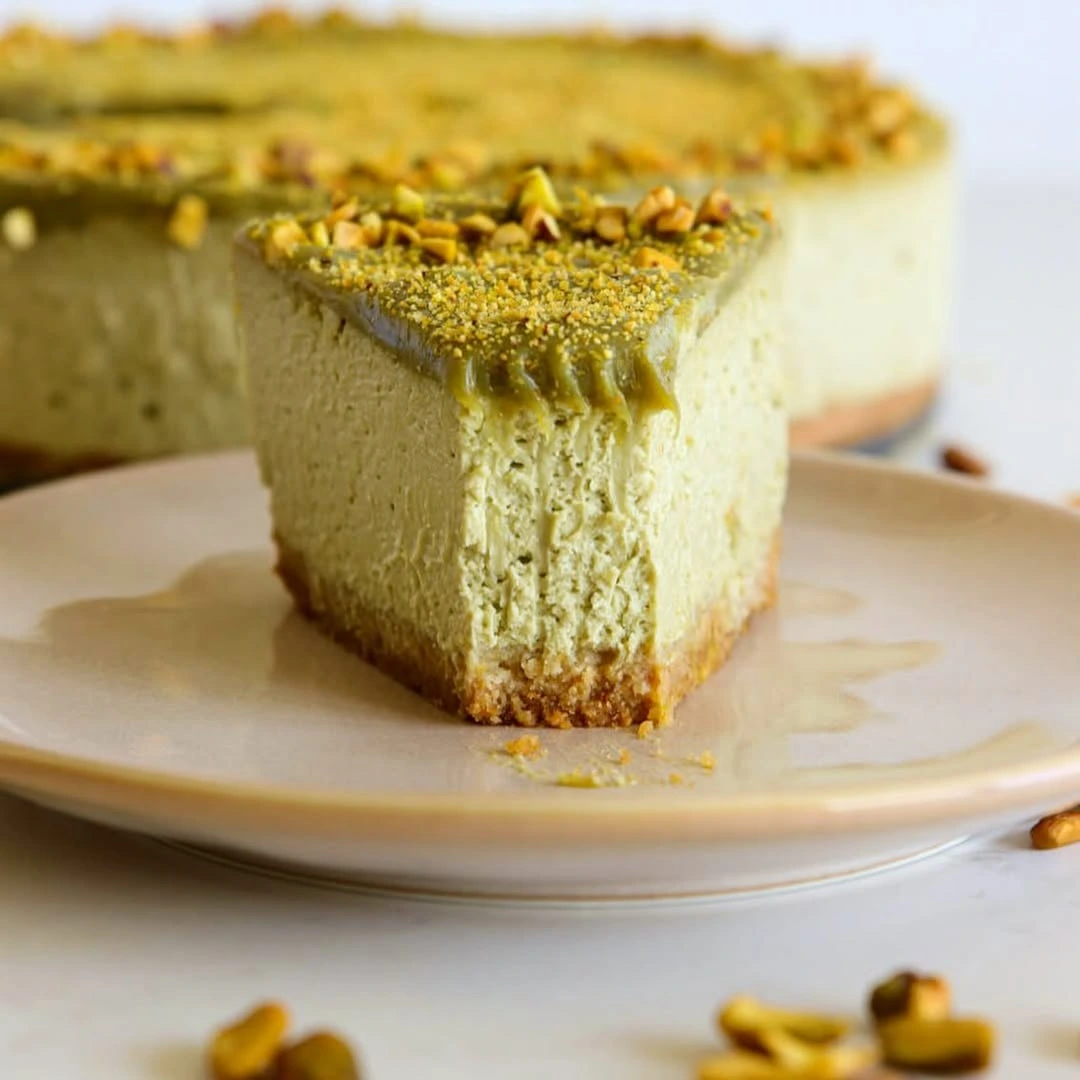
Decadent Pistachio Cheesecake Bars You’ll Crave Every Day
Who doesn’t love the creamy, dreamy delight of cheesecake? Now imagine taking it up a notch with the irresistible crunch and nutty flavor of pistachios. Sounds heavenly, right?
This pistachio cheesecake isn’t just a dessert—it’s an experience. Whether you’re hosting a fancy dinner or indulging in a sweet treat for yourself, this recipe will have everyone begging for seconds.
Don’t worry, I’ve made it super simple for you to follow. You’ll be whipping up this pistachio-packed masterpiece like a pro in no time. Ready to impress your taste buds and your guests? Let’s dive in!

Table of Contents
Why is this pistachio cheesecake the best?
Let me tell you—it’s pure magic! The creamy, velvety texture melts in your mouth, while the pistachio flavor adds a unique twist that’s rich and nutty. It’s the perfect balance of sweet and savory, with a buttery crust that ties everything together.
Plus, it’s not overly complicated to make. You’ll look like a professional baker with minimal effort! Whether it’s for a special occasion or just a sweet craving, this cheesecake is guaranteed to wow everyone. One bite, and you’ll see why it’s a crowd favorite!
Ingredients:
For the Crust:
- 1/2 cup ground almonds
- 1 cup all-purpose flour
- 1/4 cup granulated sugar
- 1/2 cup cold unsalted butter
- 1/4 tsp almond extract
For the Cheesecake Filling:
- 6 8 ounces packages of cream cheese
- 2 3 ounces boxes of instant pistachio pudding mix
- 6 large eggs
- 1 14 ounces can sweetened condensed milk
Necessary Tools
- 9×13-inch baking pan
- A food processor
- A hand mixer
- Parchment paper
- Mixing bowls
- A knife
Recipe Note:
Cream Cheese (Filling): The heart of the cheesecake! With six packages, you’ll get that luxuriously creamy texture and a tall, show-stopping dessert that’s as rich as it is indulgent.
Ground Almonds (Crust): These bring a delightful nuttiness to the crust, perfectly complementing the pistachio filling. Their crumbly texture creates a lovely contrast against the smooth, creamy cheesecake.
Pistachio Pudding Mix (Filling): This is where the magic happens. It infuses the cheesecake with pistachio flavor while giving the filling a creamy consistency without requiring extra bake time.
Sweetened Condensed Milk (Filling): The secret to ultra-smooth cheesecake. Its sweetness and velvety texture elevate the pistachio flavor and make every bite irresistible.
Almond Extract (Crust): A subtle enhancer that ties it all together. Its nutty aroma bridges the crust and filling flavors, making the cheesecake taste perfectly cohesive.
How to Make Creamy Pistachio Cheesecake Bars That Steal the Show (Step by Step)

Preparing the Crust:
#1. Combine the flour, almonds, and sugar in a food processor.
Start by adding the flour, ground almonds, and sugar into your food processor. Pulse the ingredients together a few times to ensure they are evenly mixed. The goal here is to combine the dry ingredients so the almonds and sugar are evenly distributed, setting a good foundation for your crust.

#2. Add the butter and almond extract, then process until crumbly.
Next, add the softened butter and almond extract into the mix. Pulse until the mixture begins to resemble coarse crumbs. The butter will bind everything together, while the almond extract enhances the nutty flavor, giving your crust a subtle aromatic boost.
#3. Transfer the mixture to a springform pan.
Now, grab your 9-inch or 10-inch springform pan and gently transfer the crust mixture into the pan. Use your hands or the back of a spoon to press the mixture into the bottom of the pan. Make sure to press it up the sides of the pan about 1 inch. This creates a nice, even base and walls for your cheesecake.
#4. Refrigerate for 30 minutes.
Pop the pan into the fridge and let the crust chill for 30 minutes. Chilling the crust helps it firm up and sets it in place, ensuring it holds its shape while the cheesecake sets. This step also makes the crust easier to work with during the next stages.
For the Filling and Baking:
#1. Preheat your oven to 350°F.
Before you start mixing the filling, make sure your oven is preheated to 350°F. This ensures it’s at the right temperature to bake your cheesecake evenly.
#2. Combine the cream cheese, milk, and pudding mix in a large mixing bowl.
In a large bowl, blend the cream cheese, sweetened condensed milk, and pistachio pudding mix together. Use a hand mixer or stand mixer to beat the ingredients until the mixture is smooth and lump-free. This is the base of your creamy, pistachio-infused filling.

#3. Add the eggs and mix on low speed until combined.
Crack the eggs into the bowl and mix on low speed until everything is fully incorporated. Be careful not to overmix, as this can create air bubbles, which you want to avoid in your cheesecake. You want a smooth and consistent filling.
#4. Pour the filling over the chilled crust.
Once your filling is ready, pour it gently over the chilled crust. Spread it out evenly using a spatula to ensure the top is level. This helps achieve a smooth, professional-looking finish once baked.
#5. Place the pan on a baking sheet and bake for 55-60 minutes.

Set the pan on a baking sheet to catch any potential drips and carefully place it in the oven. Bake for 55-60 minutes or until the center is almost set—it should be slightly jiggly but not liquid. If it’s too soft in the middle, give it a little extra time.
#6. Let it cool for 10 minutes on a wire rack.
After baking, remove the cheesecake from the oven and let it cool on a wire rack for about 10 minutes. This helps the cheesecake firm up before you begin the cooling process.
#7. Run a knife around the edge of the pan to loosen the cheesecake.
Once the cheesecake has cooled for 10 minutes, gently run a knife around the edges of the pan to loosen it from the sides. This step prevents the cheesecake from sticking as it cools completely.
#8. Cool for another hour.
Let the cheesecake cool for another hour at room temperature. This step ensures it doesn’t crack when you refrigerate it.
#9. Refrigerate overnight.
Cover the cheesecake loosely and place it in the fridge overnight. Chilling it for a full night allows the flavors to meld together and gives the cheesecake a firm, sliceable texture.
#10. Remove the springform pan ring and cut the cake like a bar.

The next day, once it’s fully chilled, carefully remove the ring from the springform pan. If you want to serve the cheesecake in bar-like portions, cut it into squares or rectangles by using a sharp knife. This gives you clean, neat slices, perfect for serving at any gathering.
#11. Garnish and serve.
Finally, garnish your cheesecake as desired—whether that’s with crushed pistachios, whipped cream, or a drizzle of chocolate. Serve chilled and enjoy every creamy, nutty bite!

Common Mistakes to Avoid:
Making a perfect pistachio cheesecake might seem easy, but there are a few common mistakes that can affect the texture and flavor. Let’s make sure you avoid them for a flawless dessert every time!
#1. Overmixing the Batter
Mixing the filling too much can introduce air and lead to cracks. Mix just until smooth and all ingredients are fully combined to maintain a creamy texture.
#2. Not Allowing Enough Cooling Time
Rushing the cooling process can result in a cheesecake that doesn’t set properly. Always allow it to cool at room temperature for 10 minutes, then refrigerate overnight for the best texture and flavor.
#3. Skipping the Springform Pan
Using a regular pan can make it difficult to remove the cheesecake without damaging it. A springform pan is essential for easy removal and a perfect presentation.
Storing and Reheating Pistachio Cheesecake
To store your cheesecake, cover it tightly with plastic wrap or aluminum foil and refrigerate it for up to 5 days. For longer storage, slice it into portions, wrap each piece in plastic wrap, and place them in an airtight container or freezer bag. It can be frozen for up to 3 months.
To reheat (if preferred warm), thaw frozen slices in the fridge overnight, then let them sit at room temperature for 10-15 minutes. Cheesecake is best enjoyed chilled, but a brief reheat in the microwave (10-15 seconds) can soften the texture slightly if desired.
